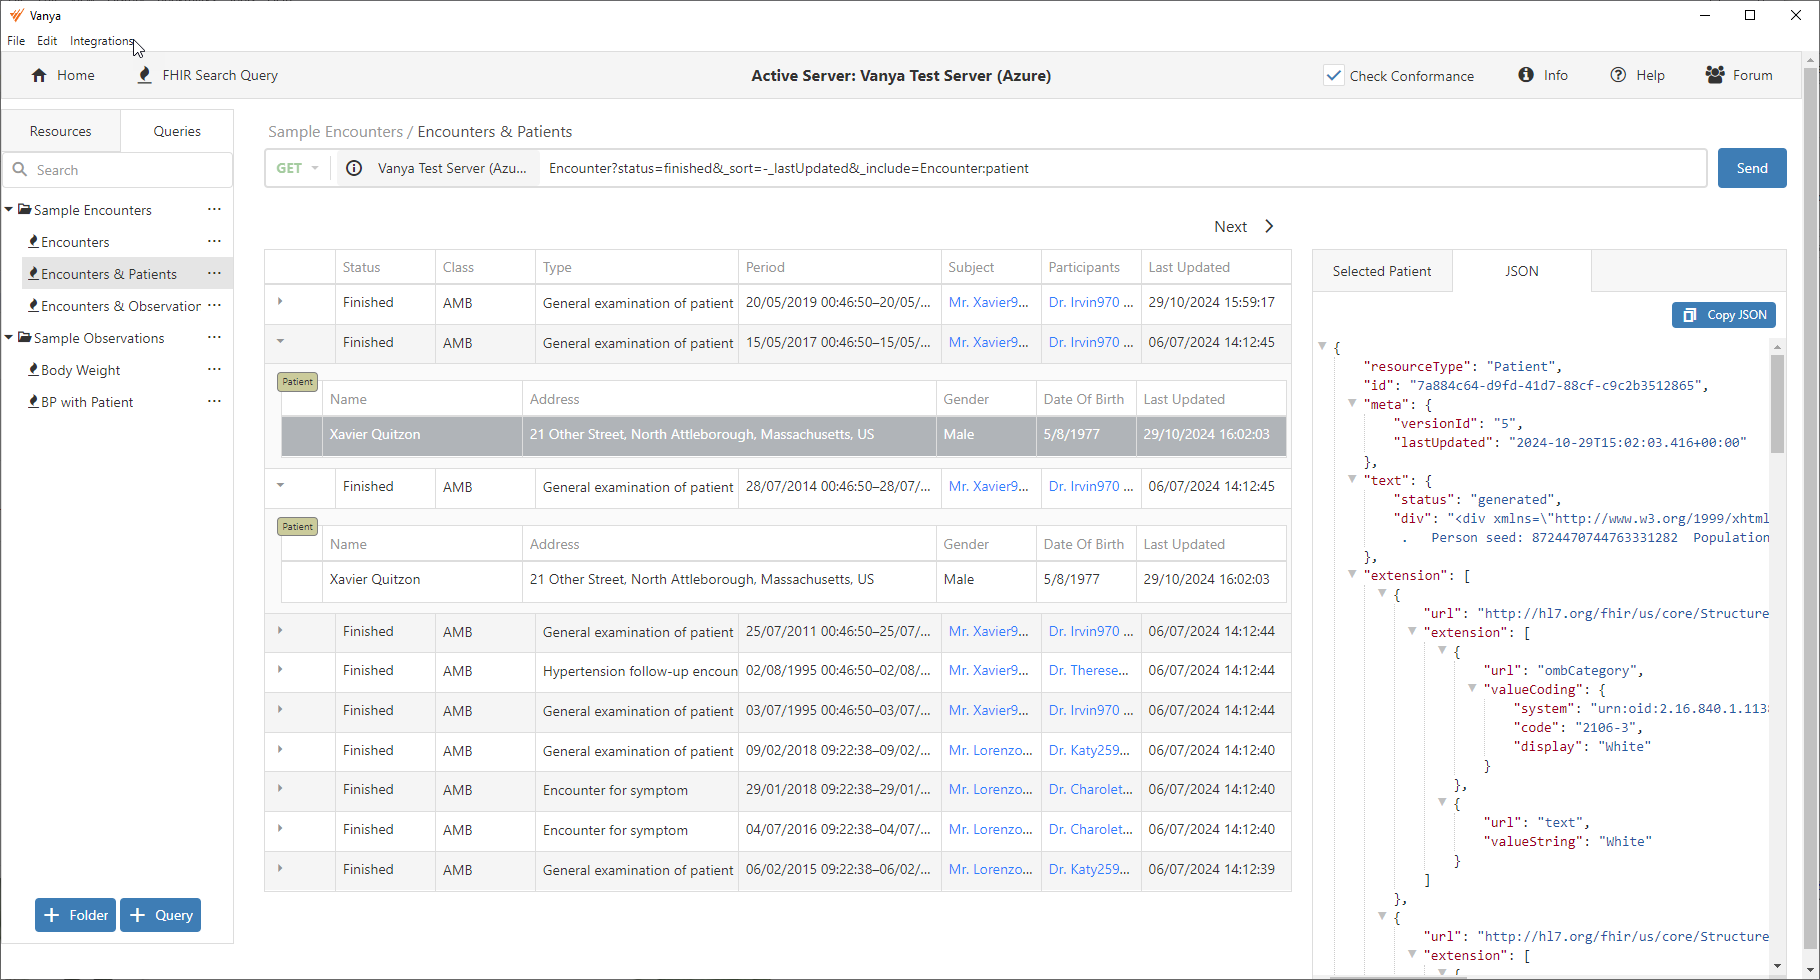
Getting Started with Vanya

01

Download and install the Vanya desktop app

Version 0.8.3 of Vanya was released on 8th June 2024. Windows and Mac downloads are available.

System requirements are few. We’ve tested the app on all recent versions of Windows and on Macs using Intel and Apple chips. When Vanya opens for the first time you’ll see three FHIR servers already configured for use: the public Firely and HAPI test servers, as well as a server of our own hosted on Microsoft Azure.

Default FHIR servers
02

Test the connection to one of the default test servers

The active server will have a yellow star to the left. To connect to a different server, click the connect button. Once connected, click on a resource type such as Patient on the left sidebar. Results should appear immediately.

The Vanya test server is populated with Patient test data generated by Syntea. All three default servers provide a good testing ground to get a feel for Vanya before trying it out on your own FHIR servers and your own data.

If you click the Add New Server button on the same page, a dialog pops up allowing you to enter server details. If the server is publically accessible without authentication — as servers hosted on Localhost often are — simply enter the server name and url.

HAPI test server

A server that requires OAuth authentication using a bearer token can be configured by populating the details on the “OAuth” tab. There is an “Extra Parameters” section at the bottom of this page that allows for implementation specific parameters such as “reource” or “scopes” for Smart on FHIR.

Azure test server

If your server is hosted on AWS Healthlake or if it’s a Google FHIR Store, fill out the authentication details on the apprpriate tab. The "Request Headers" page allows you to specify up to 5 custom headers to form part of the server request.

03

Click on a Resource and browse the results

As an example, click on the MedicationRequest link in the sidebar of Vanya. You should see data for the first 25 results, sorted by last updated date, as well as links at the top of the page to browse to the next 25 results.

The Previous Page button will always return you to the previously cached page of results, so you can jump around between Resources, drill down into the data and easily return to the initial results set you were looking at.

Medication Requests

Not all fields and data for each resource appear in the results grid. We’re currently only showing some of the most common fields. The data displayed will be expanded on in future releases.

Results are sorted by last updated date, which means you’ll always see the most recently updated resources at the top — ideal for checking if your code updated resources correctly.

Click on any row to populate the full data display for that resource. This contains every value for the resource, inlcuding all extensions, identifiers and references. The Selected tab displays the data in a user friendly way — ideal for demos or if you want a quick look.

The JSON viewer provides the complete raw JSON for the selected resource. This is great for looking at the precise detail of elements in a resource, and also for easy copying so that you can paste it into Postman for updating.

The Copy JSON button makes this easy, and maintains the JSON formatting. It’s saved my life more times that I can count!

04

Click on some Resource links

Resource links are clickable and bring you directly to that resource. The Previous Page button on the toolbar will take you back to where you were.

Observation

In the above screenshot, clicking on the highlighted Patient will open a new results page with data for that patient. Resource links will only show the name of the patient if the data contains a populated display value.

05

Now try accessing your own test server

Go back to the home page of Vanya, click the "Add New Server" button and configure your own server.

Vanya supports authentication flows for Azure FHIR, AWS Healthlake, Google FHIR Stores, and many more FHIR server providers. A full list is available on the Integrations page.

You should always be able to reach a local test server hosted on localhost. If you're unsure how to set that up, here are details on how to run a FHIR R4 server inside a Docker container on your local machine.

Once it's installed and running, add a new server in Vanya and point it to http://localhost:8080/ or whichever port you have it running on.

Click on the Patient resource or on any other resource on the left and start looking at your own data.

Throughout 2024 we’ll be adding richer functionality to Vanya, starting with full query support. We’re hoping to launch a commercial version 1 in October, and expect beta versions to be available to users as early as July.

Feedback is welcome. Please let us know what you think of the app, what works for you and what doesn’t, and what you’d like to see it do.